How to manage Microsoft 365 groups
This article is also available in my podcast and Youtube channel.
View this article as a how-to video on Youtube.
https://youtu.be/WDR3IRJPeJo?list=PLYbmn4csggdE9qNg7iIOwLJf1EUHUBvCw
Case
You need to create, edit or delete a Microsoft 365 group. The following group types are available:
- Microsoft 365 groups, also known as Unified groups
- Distribution lists
- Mail-enabled security groups
- Security groups.
In this how-to article, we will show you how to manage Microsoft 365 groups via the Admin Center portal.
Solution
To manage groups of a Microsoft 365 tenant via the Admin Center portal, go through the following steps.
- Navigate with your Web browser to https://admin.microsoft.com.
- On the left pane, click on "Teams and groups" and choose "Active Teams and Groups".
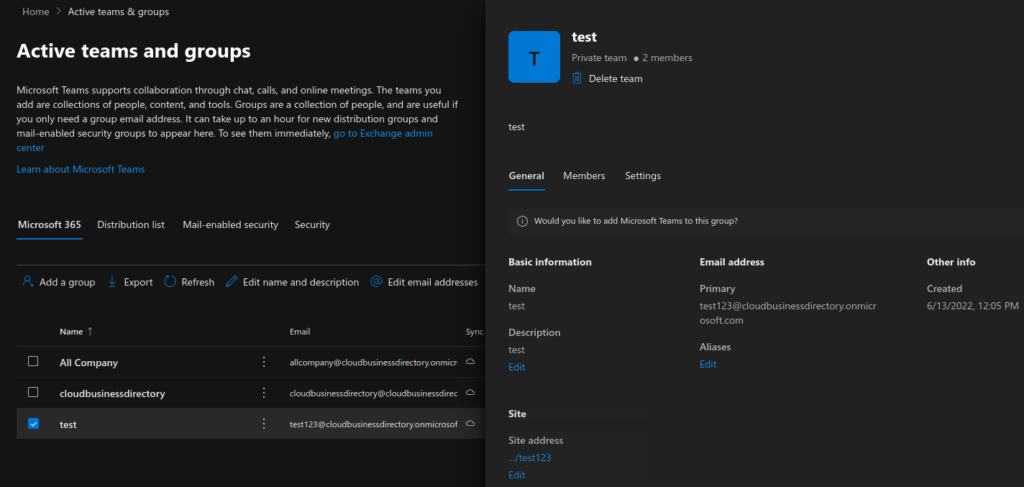
- On the "Active teams and groups" page, you can see that there are four types of groups available: Microsoft 365 groups, also known as Unified groups, distribution lists, mail enabled security groups and security groups.
- To create a new group, click on the "Add a group" button.

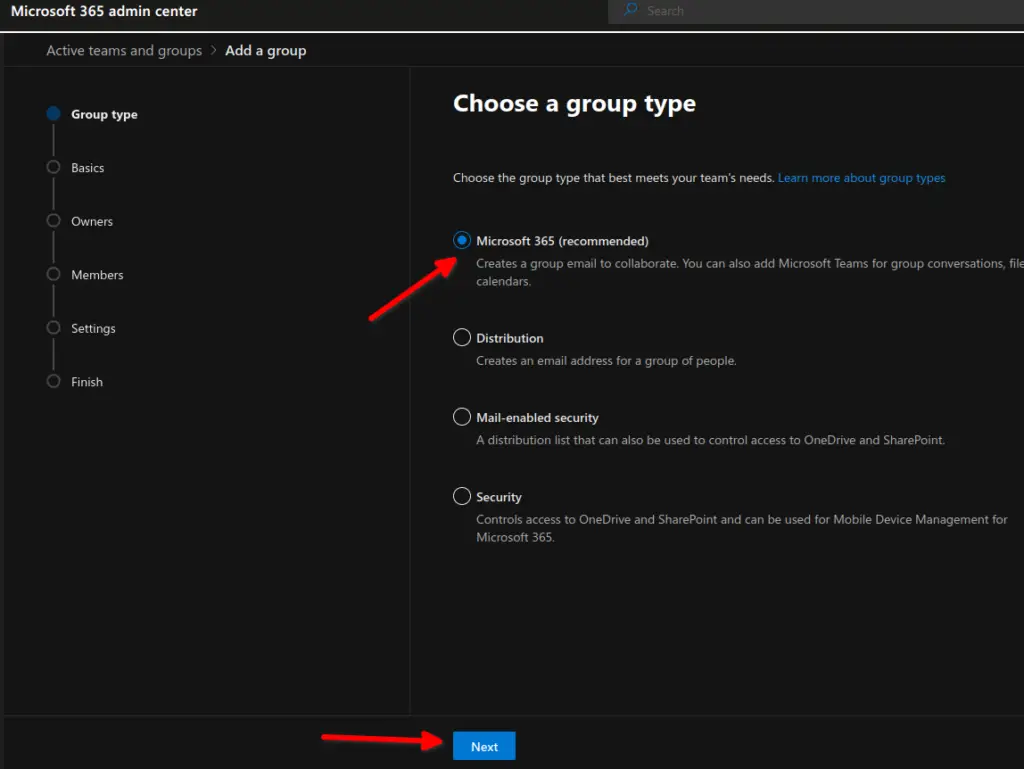
- Choose the type of group you wish to create. A Microsoft 365 group creates a group email as well as a Sharepoint Online Team site and a Microsoft Teams team for collaboration. A distribution list creates an email address for a group of people. A mail-enabled security group creates a distribution list which can also be used to control access to OneDrive and Sharepoint Online. A security group controls access to OneDrive and Sharepoint Online and can also be used for Mobile Device Management, (MDM), in Microsoft 365. The list of available parameters to set for each group depend on the group type. For the purposes of this demonstration, we will choose the Microsoft 365 group option, which has the most parameters to set up. Click on "Next" to Continue.

- On the "Set up the basics" page, provide a name and description for the Microsoft 365 group and click Next.
- On the "assign owners" page, click "Assign owners" and choose the user identities to be set as the owners of the group. You must set at least one owners but it is recommended to add a minimum of two owners. After having chosen the designated owners, click Next to continue.

- On the "add members" screen, click on "Add members" to add members. Group members can be either organization users or guest users. All group members will hve access to everything int he group. Only group members can invite guests to join the group but they cannot edit group settings.

- On the "edit settings page" provide a group email address. Also provide the privacy level of the group, which can be either public or private. A private group delegates access control to the group owners for them to allow who can join the group and who cannot. Public groups are open for everyone to join. If the group is set to private, you can also enable role assignment for the group. Assigning roles to groups can simplify the management of role assignments in Azure AD with minimal effort from your Global Administrators and Privileged Role Administrators. You can also optionally choose to create a Microsoft Teams team for this Microsoft 365 group.

- When you have finished configuring the group settings, click "Next" to continue.
- On the "Review and finish adding group" page, review all your configuration options and click "Create group" to finish creating the group. This can take up to one minute to complete. Adding a Microsoft Teams team to the group, if you have chosen this option during group creation, may take longer time to complete. You will receive a confirmation that your new group has been created. Click close to return to the Microsoft 365 groups page.
- If you need to edit an existing Microsoft 365 group, on the Microsoft 365 group page, click on the group name. On the popup form on the right, you can edit group settings under the General, Members and Settings tabs.

- Under the General tab, you can edit the group name, description, primary email address, alias and corresponding Sharepoint Online site address.
- Under the Members tab, you can edit the list of group owners and members.
- Under the Settings tab, you can edit the group privacy level, change the external file sharing level and even delete this groups's Teams team if you wish to. You can also let people outside the organization email this group or not. You can choose to send copies of team emails and events to group member's inboxes. Finally you can choose to not show the group's email address in Outlook, by excluding the group email from the Global Address List (GAL).
https://stefanos.cloud/kb/how-to-manage-microsoft-365-groups/
Comments
Post a Comment